
Hi, I am Mona and I put zippers into everything!
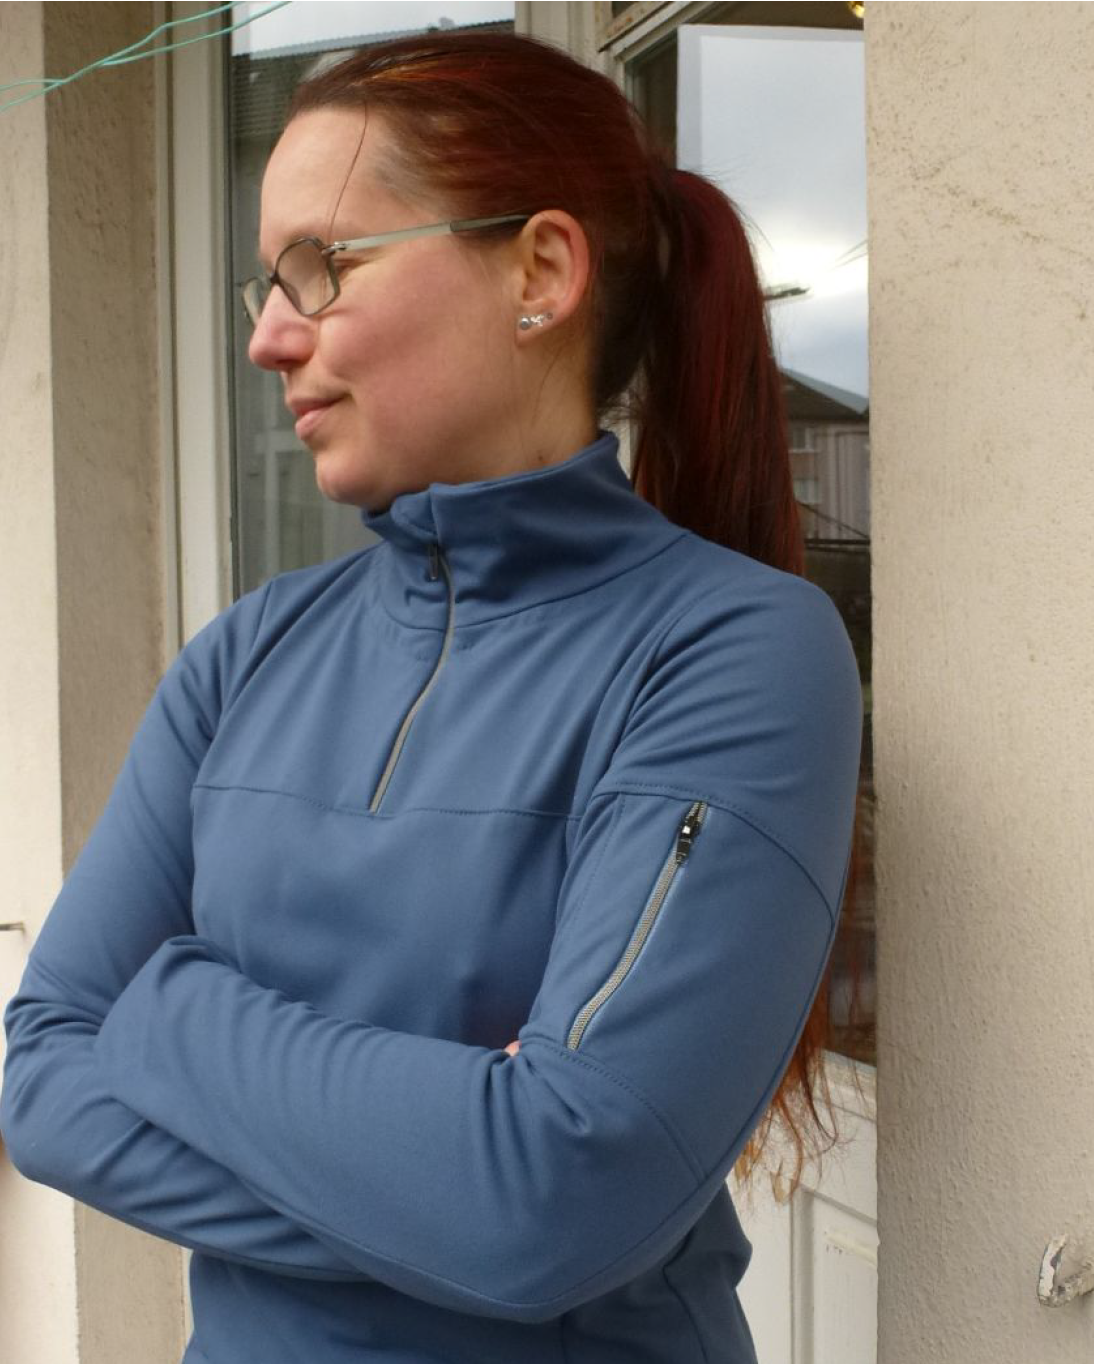
Who doesn‘t love a sleeve pocket? So convenient for running, for the gym, for winter sports, or for travelling. Perfect for a credit card, bus pass, key, banknotes, tissues, tickets, anything you want to keep safe and handy. And let‘s admit it, it just looks cool!
This pocket hack works best on the Pacific Pullover because of the two-piece sleeve. It can easily be modified for the Green Tee, Evergreen Tee, Excel Tee, Waimea Rash Guard, Hudson Pullover, or even the sweaters and jackets.
Fabric: You can either use your main fabric for the pocket pieces, for a sleek and unobtrusive look, or use the opportunity to add a colour contrast or athletic mesh. You only need scraps of a few inches length and width in addition to your normal sleeve fabric. You also need 1 1/2 inches more length than for a normal sleeve, due to the additional seam allowances.
Zipper: I recommend using nylon coil zipper tape because it is flat and lightweight. Pick a small and unobtrusive zipper pull, too.
Pattern preparation:
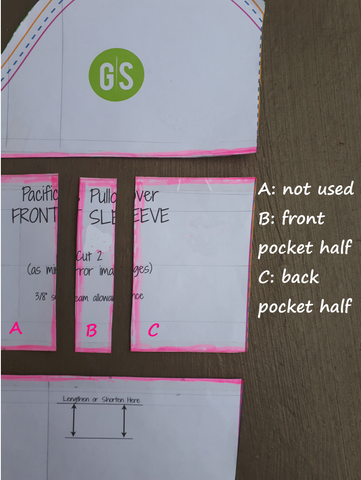
We are going to cut up the front sleeve piece. If you do not want to cut your master copy apart, print or trace the centre front piece again. First decide if you want the pocket on the left or right sleeve. The pattern piece with the right side
up is for the left sleeve, so if you want the pocket on your right sleeve, use the pattern piece wrong side up.
Take some time to consider the placement and dimensions of your pocket. Maybe you have a ready-to-wear shirt to compare to. For the pocket to sit comfortably on your upper arm I like to place it right under the armpit corner (leave enough space for the armhole seam allowance). The zipper sits in the centre of the sleeve, aligned with the notch at the top of the sleeve cap. The pocket starts an inch or two to the left of the zipper and extends to the vertical sleeve seam. You can measure the length of the pocket on your body, in order to make sure that it ends well above the elbow. I like to make mine 4 to 5 inches long.

Cutting the pieces:
Cut the two horizontal lines first. Add seam allowances at the cut edges! We will call these the sleeve cap, the pocket base, and the lower sleeve. Cut one of each from your fabric. Then cut the vertical lines on the pocket base paper piece. The larger, leftmost section is not used. The narrow middle piece is the front pocket half, and the right side piece is the back pocket half. Add seam allowance on all four edges of the front pocket half, and on all but the right side edge of the back pocket half. Cut one of each from your fabric.

Cut your zipper tape to the length of your pocket base. In fact I recommend cutting it an inch or two longer than you need, so that you can keep the zipper pull out of the way while installing the zipper. You can also do the first sewing step before adding the zipper pull, but it is easy to forget then!!
Step 1: Installing the Zipper
Lay the closed zipper right side up, apply wondertape to the left side, and attach the front pocket half, right sides together. Stitch with a zipper foot, with a medium length straight stitch close to the zipper teeth. Apply wondertape to the
right side of the zipper tape, attach the back pocket half and stitch in the same way. Topstitch the seams if you like, and trim the zipper tape at the top and bottom, making sure that your zipper pull is not sitting on the bit that you are cutting off.

Step 2: Pocket Assembly
Lay your pocket base right side up. Mark the position of the front pocket seam with pins or with a
wash-away pen (you can use your discarded paper piece A for this).
Lay your pocket piece with the zipper right side down onto the pocket base, so that the edge of the
front pocket half can be sewn in the marked seam position.
Stitch with a medium length straight stitch or with a narrow stretch stitch. Fold the pocket piece
over and topstitch the seam if you like.


Step 3: Sleeve Assembly
Before you continue, make sure that you have a zipper pull in your zipper! Just saying ;) Pin and stitch the sleeve cap and lower sleeve to the pocket base right sides together. As these seams go across the zipper, I recommend stitching with a sewing machine first, going slowly over the zipper teeth. Then trim the zipper teeth within the seam allowance and go over the seam again with a serger if you prefer this finish. Topstitch both seams with the seam allowance away from the
pocket base. Continue with the rest of the assembly according to the pattern instructions.

If you want to use this hack on one of the other Greenstyle tops that do not have a two-piece sleeve, you have two options:
1) Add your own vertical split into the sleeve.
2) Add a seam on the back pocket half just like on the front pocket half. This can be sewn with the pocket piece wrapped all the way around the back of the pocket base, or you could just fold in the seam allowance and topstitch the pocket onto the base. This method can also be applied on the Pacific Pullover if you do not want the pocket to reach all the way to the back sleeve seam.

