

by Nancy Altilia
Loved for its simple design, the Pacific Pullover is a go-to pattern for Greenstylers looking for a fast sew for semi-fitted pullover that can be a base layer, a sun shirt, a run shirt, or a fleecy, cozy warm up. Now, modify the Pacific to have a full-length front zipper, and you have these same options with the ease of a peel-it-off jacket. All it takes is a few simple changes to make the Pacific Pullover into a Pacific Jacket.
This post will show you how to change the front and hood facing pieces to accommodate a full zip and an optional step to add a zipper guard. Many of the details, tips and tricks to insert the zipper are already included in your pattern’s instructions, so this blog is meant to be an add-on to your Pacific Pullover guide. There are also terrific instructions on zipper installation in the Sundance Jacket pattern if you are still working on your zip skills.
So, go grab the Pacific Pullover pattern, and let’s go.
Here’s what you will need:
- Greenstyle Pacific Pullover pattern (hood facing piece will be altered to do this hack).
- An 8” x 10” piece of tracing or pattern paper
- A separating zipper. The length of your zipper measures the length of your jacket front plus the length of the hood/collar, minus approximately 2 inches.
- Fabric requirements:
- Size: To convert the Pacific Pullover to a jacket, you do not need to alter your size. The pullover sizing already accommodates a zipper.
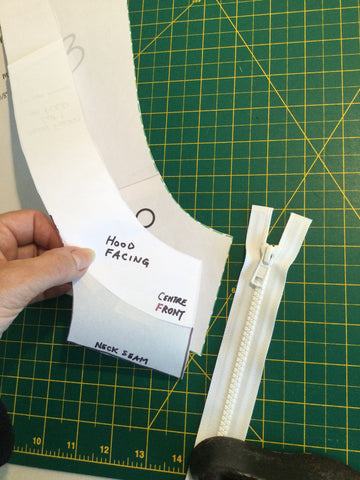
1) Make a print-out of the pattern pieces for the hood and the hood facing. Using the hood as your guide, draw an extension to the facing so they match as shown. See the pattern instructions for the placement of interfacing on the hood/collar facing and cut your interfacing to match the new facing you’ve just drawn.
When sewn together, the facing and the hood will both attach to the neck seam at the front of the jacket.


2) Cut two mirror-image pieces of the jacket front (do not cut on the fold as indicated on the pattern piece).

3) Assemble the jacket to where the collar or hood is attached to the front pieces. Measure your zipper so that you can hem the jacket (the pattern calls for a 1” hem). The top of the zipper should stop at the top of the hood/collar.

4) Optional: add a zipper guard by cutting a strip of fabric 2 ½” wide and about 2” longer that the finished length of your zipper. With right sides together, sew a curve on one end and straight across the other end. Note the curve in relation to the folded edge of your strip. Turn inside out and press. Baste the guard onto your zipper (it doesn’t matter which side of the zipper you choose)


5) Install your zipper.

6) Turn the hood/collar facing down and stitch in the ditch down the front, onto the zipper.

7) Place the hood/collar facing on the neck seam and stitch in the ditch or top stitch as you prefer.


8) For the hood version, you can topstitch your hood cord channel at this point.


