

If you're Brassie Jogger obsessed like I am, and you've made more pairs than you could possibly count, your Brassie pockets could probably use a little excitement at this point. In this blog, I'll show you six creative new ways to finish your pockets.

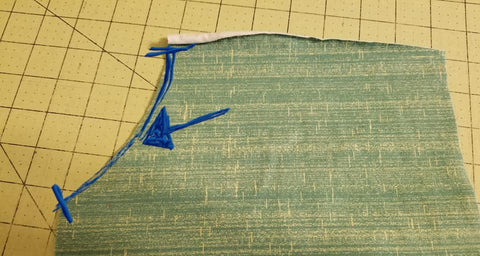
As designed, the Brassie pockets have a hemmed opening and stitched-down pocket facings. For all hacked versions described below, you will need to cut all of the original pattern pieces for your joggers that you would normally cut if you were making the hemmed, curved pocket option - two front legs, two back legs, two pocket facings, two cuffs, and one waistband. Additionally, for any of these modifications, you will need to calculate the measurement of the pocket opening for your size (see blue line below). Add at least one inch to this length for ease of use, and keep this measurement handy. It should be about 7 to 8 inches for the midrise style. (This measurement will be referred to as the "pocket opening length" for future reference.)
The original pattern calls for a strip of interfacing at the pocket opening. You can continue to use interfacing in all of the methods introduced below, but if you are sewing heavier, more stable fabrics, you may find that it isn't really necessary. I did not use it for any of the pairs I made below.
1) Face your Brassie pocket openings.
To face your Brassie pocket openings, you will need two strips of fabric 1.5 inches tall by the pocket opening length.

Pin or clip one facing strip to the pocket opening on one front leg piece, right sides together.

Without stretching, sew or serge together.

Open the facing and fold to the inside of the leg, also folding the seam allowance to the inside of the leg. (None of the seam will show on the front of the leg if the seam allowance is folded correctly.) Press well.

Topstitch 1 inch from the edge. You can use a coverstitch, a double needle stitch, or a zigzag stitch. I have used a coverstitch here.

Repeat the process for the other leg. Finish your joggers according to the Brassie Joggers tutorial.

These Brassies are made from custom printed cotton spandex jersey from Seweird.
2) Band your Brassie pocket openings.
To band your Brassie pocket openings, you will need two strips of fabric 1.5 inches tall by the pocket opening length. Iron the strips in half the long way with raw edges aligned and wrongs sides facing each other, and pin or clip the raw edges of the band along the raw edges of the pocket opening. Without stretching, sew or serge one band onto the pocket opening of one leg the same way that you band other edges like necklines. Flip the band out, folding the seam allowance toward the inside of the leg, press, and topstitch. I topstitched with a zigzag here.

Repeat for the other leg, and follow the instructions in the Brassie Joggers tutorial to complete your garment. I made these Brassies from custom cotton spandex French terry from Seweird, and I used 12 oz. cotton spandex from The Fabric Fairy for the bands.

I also banded the pockets on this pair made from Arete athletic fabric from Greenstyle.

I used my coverstitch to topstitch the pocket bands on this pair.

3) Bind your Brassie pocket openings with fabric.
To bind your Brassie pocket openings with fabric, you will need two strips of fabric 1.5 inches tall by the pocket opening length. Align one strip of binding with the pocket opening of one leg, raw edges together and right sides facing. Pin or clip.

Without stretching, sew or serge the binding strip along the pocket opening of the leg.

Press the binding toward the seam allowance. Do not press the seam allowance toward the inside of the leg. (Please note that I sandwiched specialty elastic between the leg and the binding for a little extra sweetness, but you can bind without this.)

For single fold binding, wrap the binding strip firmly around the seam allowance on the inside of the leg (but do not fold the seam allowance toward the leg), and press.
For double fold binding, with the wrong side of the leg piece facing up and the seam allowance laying flat (not folded in toward the leg), fold the remaining raw edge of the binding toward the outside edge of the seam allowance. You will still be able to see the seam allowance. Press.

Fold the binding toward the inside of the leg again, covering the seam allowance and enclosing the raw edge of the binding.

Pin or clip securely.

For both single and double fold binding options, topstitch on top of the binding on the front side of the leg, catching the binding on the inside of the leg in your stitching.

If you bound using the single fold technique, trim any extra fabric on the inside. (I chose to use the single fold technique for this pocket opening because of the added layer of the specialty elastic in order to avoid any additional bulk. Both methods look neat and clean from the front when finished.)

Repeat for the other leg. Your bound pocket will look like this.

Finish your Brassie Joggers according to the main tutorial. I made this pair using ABP 265 (265 gsm athletic brushed poly) from Bow Button Fabrics.

4) Bind your Brassie pocket openings with foldover elastic (FOE).
To bind your Brassie pocket openings with foldover elastic, cut two pieces of FOE the length of the pocket opening. Lay the leg piece right side up on top of the FOE wrong side up, with the edge of the fabric aligned with the center fold of the FOE, and pin carefully, following the curve.

Baste in place.

Wrap the FOE around the raw edge of the pocket opening, and pin or clip carefully. If you wish to sandwich a specialty trim in place, do so at this step. In the picture below, I demonstrate how to make either choice.

Topstitch on the front side of the leg, sewing through both sides of the FOE and the pocket opening. I used the zigzag on my sewing machine for this step, but you could use a double needle or a coverstitch just as well.

Attach the pocket facing according to the Brassies tutorial. It will look similar to this.

Repeat for the other leg, and follow the instructions in the main tutorial to finish your Brassies. (This is actually a pair of Venice Beach Shorts, but all of these methods work equally well with any of the Greenstyle pants pockets.)

5) Add raw edge ruffles to your Brassie pockets.
To add raw edge ruffles to your Brassie pockets, you will be implementing either the single or double fold binding method while carefully sandwiching a ruffle in between the leg and the binding in the process. Cut two strips of fabric as for fabric binding above (1.5 inches tall by the pocket opening length). Also cut two strips 1.5 inches tall by twice the pocket opening length. Use your preferred method to gather one long side of each of the two longer strips. Pin the ruffle to the pocket opening of each front leg piece with both the right side of the ruffle and the right side of the leg facing up. (The wrong side of the ruffle should face the right side of the leg.)

Next, pin one strip of binding wrong side up on top of the ruffle with the raw edges of the leg pocket opening, ruffle, and binding all aligned.

Serge or sew the three pieces together with the ruffle sandwiched between the pocket opening on the leg and the strip of binding. Open the binding and press.

To finish the binding, use either the single fold method or double fold method described under the instructions for binding with fabric above. I used the double fold method and my coverstitch to finish the bindings for these pocket openings.

Continue to construct your Brassies per the main tutorial. When you baste the pocket facings to the front legs as shown below in blue, be sure to catch the edge of the ruffle in the basting along the outseam and waist edges.

This way, the ends of the ruffle become nicely enclosed in the outseam and waistband seam.

Finished, your ruffled pockets will look like this.

I made this pair out of custom printed cotton spandex jersey from Seweird, and I used 10 oz. cotton spandex jersey from The Fabric Fairy for the ruffles.

6) Add pocket bags to your Brassies.
For this modification, you will have to create one new pattern piece, but it is quite easy to make. Start by tracing around the original pocket facing onto a fresh piece of paper.

Cut on the traced line. Place the new pattern piece behind the front leg pattern piece, making sure the edges are aligned at the outseam and waist. Trace the pocket opening curve from the front pant leg onto the new pattern piece.

Cut on the line. Discard the smaller cut off piece. The new pattern piece is called the Pocket Bag.

In addition to the usual fabric pieces cut for your joggers, also cut two pocket bag pieces in mirror image.

With right sides facing, clip or pin one pocket bag to one front leg at the pocket opening.

Sew or serge together.

Flip the pocket bag to the inside of the leg and press the seam allowance toward the inside. (The seam should not show on the front of the leg if folded and pressed correctly.)

Understitch the seam by topstitching through the pocket bag and seam allowance only (not through the front leg). Press well.


With right sides facing, clip or pin the curved edges of the pocket bag and pocket facing together.

Serge or sew together (below, back), and lay pocket against inside of front pant leg (below, front).

Baste the new pocket to the front leg along the outseam and waist edges only.

Treating your front leg piece as though the steps to create the pocket have been completed, finish your Brassie Joggers according to the main tutorial.

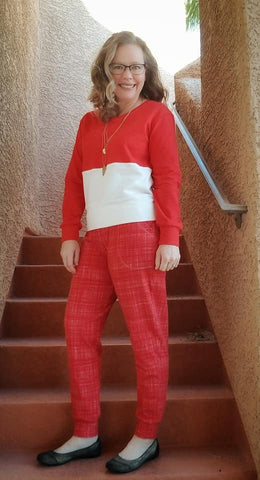
I made this pair out of Arete athletic fabric from Greenstyle, a high performance supplex-like poly/spandex jersey. The "gold dust" is printed, not topical glitter, so it's permanent! I think this print is just gorgeous!

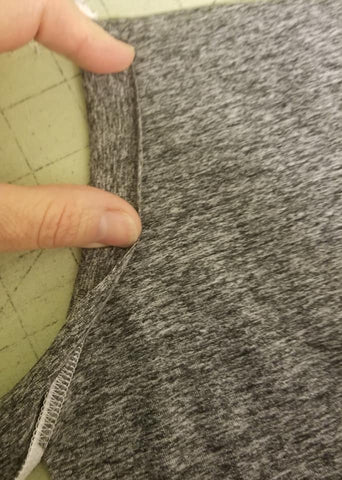
I also used the pocket bag method for these Brassies, also made of Greenstyle athletic fabric. This picture shows the inside of the pocket so you can see what the understitching looks like after the pocket is finished.

What pocket bags add in bulk, they make up for in functionality. I think they are a little bit sturdier than faced pockets. I only use this method, however, when using thicker, more stable fabrics that hold their shape well. Pocket bags sewn from very lightweight fabrics like double brushed poly will sag inside your pant legs and create wrinkles and bulk. The pocket bag method works well with cotton spandex, cotton French terry, Supplex type blends, and the heavier varieties of athletic brushed poly.
Which pocket opening modification will you try on your Brassie Joggers first? Please be sure to share pictures in the Greenstyle Creations Facebook group when you finish!
Written by Beth Doglady


Comments
Super helpful post! I am going to start making Brassies in 2021 and you have inspired me and made me more confident. Thank you for sharing your knowledge.
Thank you for this, I love my Brassie joggers and its good to see how the look can be changed by small details.
Happy New Year
Thank you for sharing your expertise. This is really helpful.